How to Tarp a Roof for Emergency Repairs
Puetz Construction | 7 Minute Read
When severe weather strikes your Minnesota home, roof damage can happen quickly. A damaged roof leaves your property vulnerable to water damage, mold growth, and structural issues. Learning how to tarp a roof properly can provide crucial temporary protection until professional repairs arrive.
This comprehensive guide covers everything you need to know about emergency roof tarping, including when to attempt it yourself versus calling professionals, essential materials and tools, step-by-step installation instructions, and important safety considerations. We’ll also explore when temporary fixes become insufficient and permanent solutions are necessary. Here’s what we’ll cover:
- When you need to tarp your roof
- 6 step roof tarping process
- Safety considerations and limitations
- Temporary vs. permanent solutions
🤔 When You Need to Tarp Your Roof

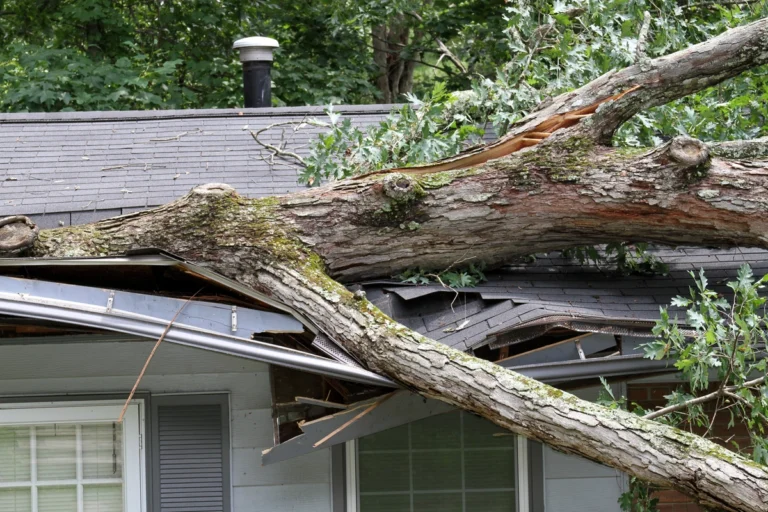
Emergency roof tarping becomes necessary when your roof sustains damage that compromises its ability to keep water out. Storm damage from high winds, hail, or falling debris can create openings that require immediate attention.
Common Situations Requiring Emergency Tarping
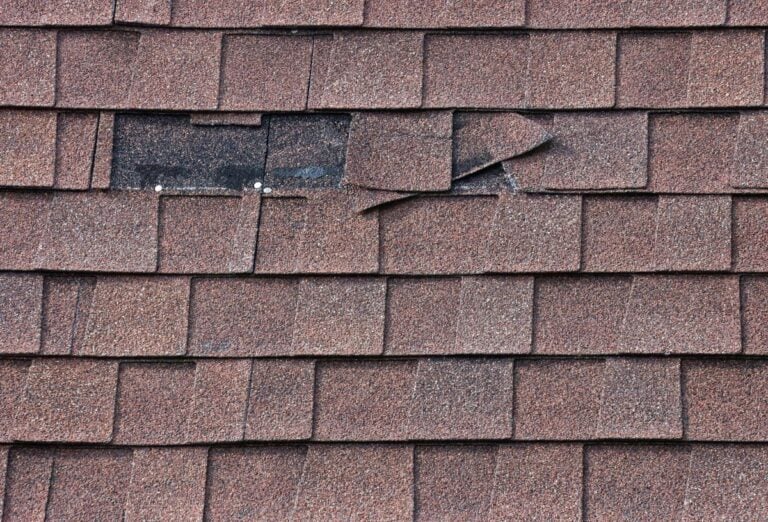
- Missing or damaged shingles create vulnerable spots for water to penetrate your home’s structure, leading to potential interior damage during rainfall.
- Wind damage can lift shingles or tear sections away, exposing the roof deck underneath.
- Hail damage, even if not immediately visible, can weaken shingle integrity, allowing moisture to seep through and cause wood rot.
- Tree branches or debris can puncture holes directly through roofing materials.
- Chimney damage, torn flashing around vents, or damaged gutters can also create water entry points.
- Prompt repairs are essential to prevent water from damaging insulation, drywall, and flooring inside your home.
Essential Materials and Tools
Proper roof tarping requires specific materials designed to withstand weather conditions and provide reliable protection. Using the right supplies ensures your temporary fix will hold until professional repairs can be completed.
- Tarp Selection: Use a heavy-duty polyethylene tarp, at least 6 mil thick, rated for outdoor use. Ensure it extends 4 feet beyond the damaged area and consider reinforced tarps with woven mesh and grommets for secure attachment.
- Fastening Materials: Use 2×4 lumber boards to secure tarp edges and distribute weight evenly. Galvanized roofing nails or screws provide strong attachment, while roofing cement or caulk seals nail holes.
- Safety Equipment: Always use a sturdy ladder that extends 3 feet above the roof edge, non-slip shoes, and a safety harness with roof anchors for protection. Work gloves are essential for handling rough materials.
- General Tips: Size the tarp generously for full coverage, and have a helper to assist with ladder stability and material handling.
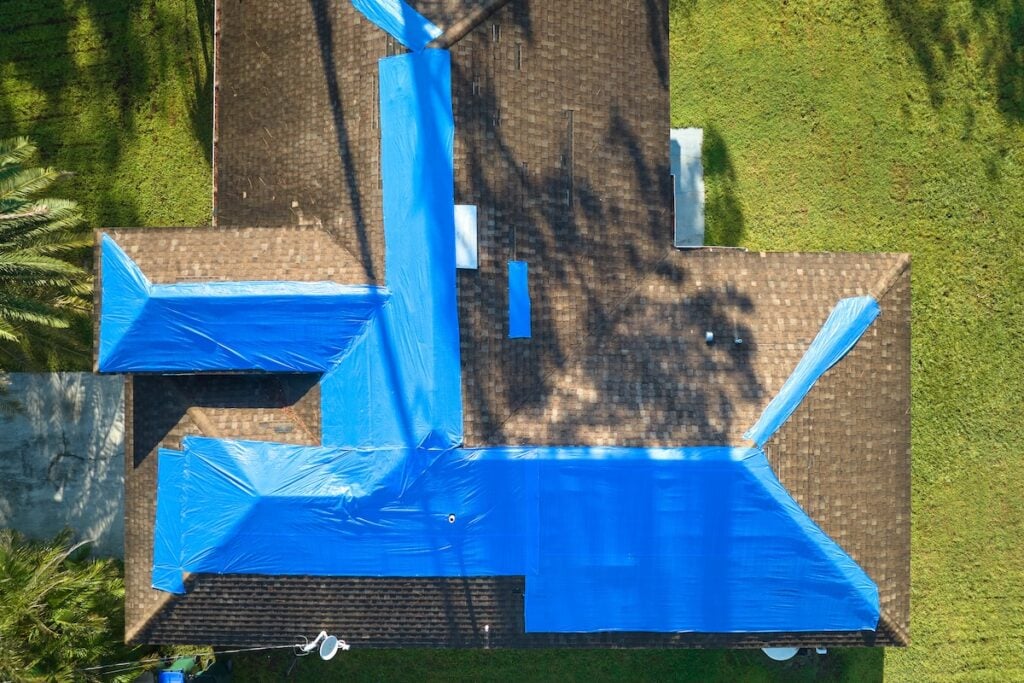
✅ 6 Step Roof Tarping Process

Proper installation technique determines how well your emergency tarp will protect your home. Following these steps ensures maximum effectiveness and longevity of your temporary repair.
1. Safety First Assessment
Before climbing onto your roof, evaluate the damage from the ground using binoculars. Never work on wet, icy surfaces or during poor weather conditions. Ensure your ladder is secure and have someone assist you from the ground. Clear away debris to prevent slips and gather all materials, including your tarp, wooden boards, nails, and ice and water shield.
2. Measure and Prepare the Tarp
Calculate the area of damage and add at least 4 feet of overlap on all sides. This ensures complete coverage and prevents water from seeping in. Inspect your tarp for tears and pre-cut wooden boards to secure the edges. If you’re covering an entire roof or a flat roof, ensure proper alignment to direct water flow.
3. Position the Tarp Correctly
Start from the highest point of the damage, draping the tarp downward. If the damage is at the top, extend the tarp over the roof peak to prevent water from entering. Ensure the tarp lies flat without wrinkles or air pockets that could catch wind, and let the excess material extend beyond gutters to keep water away from your home’s foundation.
4. Secure the Upper Edge
Use a 2×4 wooden board along the upper edge of the tarp, nailing it into the roof deck every 6 to 8 inches. Roofing cement can seal the nail holes, adding extra protection against water infiltration. This top edge takes the most stress from wind and water, so secure it carefully.
5. Attach the Side Edges
Pull the tarp taut as you secure the sides with additional wooden boards. Maintain even tension to avoid ripping, and fold corners neatly to prevent wind from catching loose material. Trim any excess tarp that extends too far.
6. Seal and Reinforce
Apply roofing cement along all edges and ensure there are no gaps or weak points. Add extra fasteners in high-stress areas, especially for flat roofs or regions prone to strong winds. For added durability, you can use an ice and water shield underneath the tarp for better water resistance.
🦺 Safety Considerations and Limitations
Roof work involves significant risks that require careful consideration. Understanding these limitations helps you make informed decisions about when to attempt repairs yourself versus calling professionals.
Weather-Related Risks
Never attempt roof work during active storms, high winds, or when surfaces are wet or icy. Morning dew can make roofing materials dangerously slippery. Wait for completely dry conditions and calm weather before starting work.
Wind can turn tarps into sails that pull workers off balance. Even moderate breezes can make material handling difficult and dangerous. Check weather forecasts and postpone work if conditions aren’t ideal.
Physical Limitations
Steep roofs require professional expertise and specialized safety equipment. Most homeowners should avoid working on roofs with slopes greater than 6/12 pitch. Age, physical condition, and experience level all factor into whether DIY tarping is appropriate.
Multiple-story homes present additional risks that often exceed safe DIY limits. The consequences of falls increase dramatically with height, making professional installation the safer choice for many situations.
When to Call Professionals
Extensive damage covering large roof areas requires professional assessment and repair. If you’re uncomfortable with any aspect of the work, professional roofers have the experience and equipment to complete the job safely.
Complex roof designs with multiple levels, skylights, or unusual features make proper tarping more challenging. Professional contractors can navigate these complications and ensure adequate protection.
⚖️ Temporary vs. Permanent Solutions
Emergency tarping for roof damage provides crucial short-term protection, but understanding its limitations helps you plan for permanent repairs. Tarps are designed as temporary measures, not long-term roofing solutions, to prevent further damage.
Duration Expectations
Quality tarps properly installed can provide protection for several weeks to a few months, depending on weather conditions. UV exposure gradually degrades tarp materials, making replacement necessary over time.
Heavy snow loads, ice formation, and repeated freeze-thaw cycles can compromise tarp integrity. Regular inspection and maintenance help identify when replacement or permanent repairs become necessary.
Planning for Permanent Repairs
Contact roofing professionals as soon as possible after emergency tarping. Insurance claims processing and contractor scheduling can take time, so early communication prevents delays in permanent repairs.
Document the damage thoroughly with photos before and after tarping installation. This documentation supports insurance claims and helps contractors plan appropriate repairs.
Maintenance and Monitoring
Check your emergency tarp regularly for signs of wear, loosening, or damage. High winds can work fasteners loose over time, requiring periodic tightening or reinforcement.
Snow and debris accumulation can stress tarp materials and fasteners. Remove excessive loads carefully to prevent additional damage to both the tarp and underlying roof structure.
👨🔧 Trust Puetz Construction for Your Roofing Needs
Tarping a roof is a critical step in protecting your home after unexpected damage, but it’s just the beginning of the repair process. While a properly installed tarp can prevent further water intrusion and minimize damage, long-lasting solutions require expert attention. That’s where Puetz Construction comes in. With over a decade of roofing experience, our team of roofing contractors is ready to provide the professional repairs your home needs to stay secure and retain its value.
From emergency tarping to full roof replacements, we handle every project with precision, reliability, and a focus on customer satisfaction. Don’t leave your home’s protection to chance—contact Puetz Construction today for a free damage inspection and let us restore your roof with craftsmanship you can trust. Call or visit our website to schedule your consultation now!
Fresh From our Blog