7 Types of Roof Storm Damage (& What to Do Next)
Puetz Construction | 20 Minute Read
Storm damage to a roof includes any harm caused by severe weather events such as wind, hail, heavy rain, lightning, or falling debris. The most common types of roof storm damage include wind damage (missing or curled shingles), hail damage (dents and granule loss), and water damage (leaks and moisture intrusion). Each year, severe weather causes over $15 billion in insured losses to homes across the United States, with roofs being the most vulnerable component.
Understanding the different types of storm damage and knowing what steps to take immediately after a storm can save you thousands of dollars and prevent minor damage from becoming a major structural problem. This comprehensive guide covers everything you need to know about identifying roof storm damage, filing insurance claims, and working with roofing contractors to restore your home’s protection.
In this guide you’ll learn:
- How to identify 7 types of roof storm damage
- Typical repair costs for each damage type
- Next steps upon damage discovery based on type

9 Types of Roof Storm Damage
Storms can wreak havoc on your roof, leading to various types of damage that can compromise its integrity. Understanding these different forms of storm-related damage is crucial for timely roof repairs and maintenance.
1. Wind Damage
How to Identify Wind Damage
Wind damage is one of the most common types of roof storm damage, especially during hurricanes, tornadoes, or severe thunderstorms. Strong winds can lift, tear, or completely remove roofing materials, leaving your home vulnerable to water intrusion.
Visual signs of wind damage include:
- Missing shingles: High winds (50+ mph) can lift and remove entire shingles from your roof, exposing the underlayment or roof deck to the elements
- Curling or peeling shingles: Partially lifted shingles may curl back or peel away from the roof surface, breaking the weatherproof seal
- Lifted shingle edges: Even shingles that remain attached may have lifted edges that can catch future winds and allow water penetration
- Loose or damaged flashing: Metal flashing around chimneys, vents, and roof edges can be bent, lifted, or torn away by strong winds
- Granule accumulation: Wind-damaged shingles often lose protective granules, which accumulate in gutters or on the ground
- Debris on roof: Branches, leaves, and other debris scattered across your roof may indicate wind damage occurred
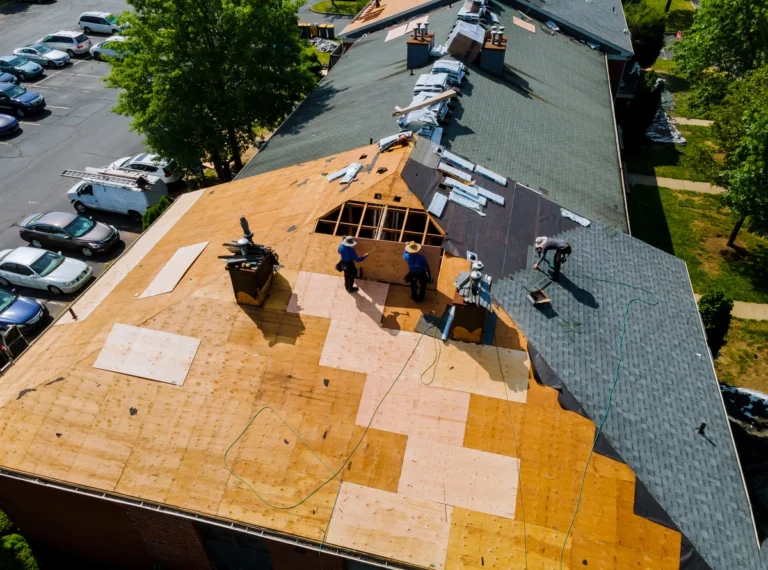
What to Do Next
Step 1: Conduct a Safe Inspection
Begin with a visual inspection from the ground using binoculars. Look for obvious signs like missing shingles, exposed underlayment, or debris. Only use a ladder if you can do so safely, and never walk on a damaged roof.
Step 2: Document the Damage
Take clear photos and videos from multiple angles showing: close-ups of damaged areas, wide shots showing the full extent of damage, any debris that caused additional impact, and date-stamped images for insurance purposes.
Step 3: Temporary Protection
If you can safely access damaged areas, secure loose shingles with roofing cement or nails. Cover larger exposed areas with weighted tarps. Keep all receipts for materials and labor for insurance reimbursement.
Step 4: Contact Professionals
Call your insurance company within 24-48 hours to report the damage. Then hire a licensed roofing contractor experienced with storm damage for a professional assessment and written estimate.
Typical wind damage repair timeline: 1-3 days for minor repairs, 1-2 weeks for moderate damage, 2-4 weeks for extensive repairs requiring shingle replacement over large areas.
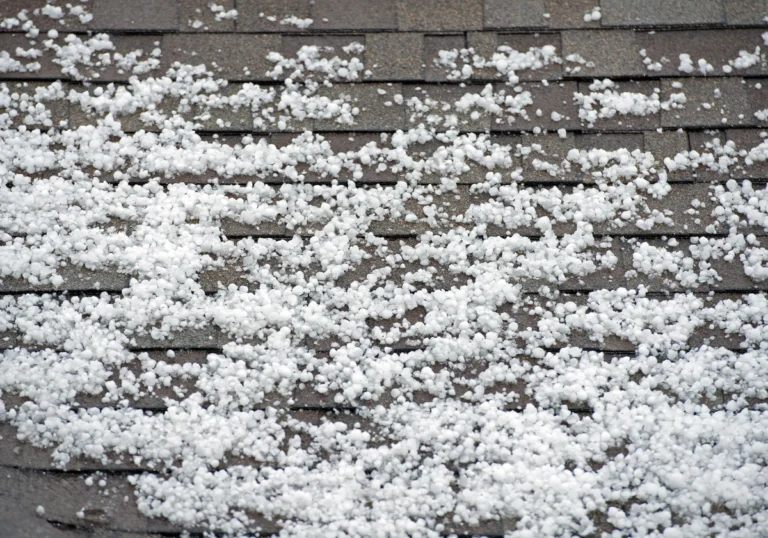
2. Hail Damage
How to Identify Hail Damage
Hail damage can be deceptive because it may not cause immediate leaks, but it significantly compromises your roof’s integrity and lifespan. Hailstones larger than 1 inch in diameter can cause substantial damage, though even smaller hail can harm aged or brittle roofing materials.
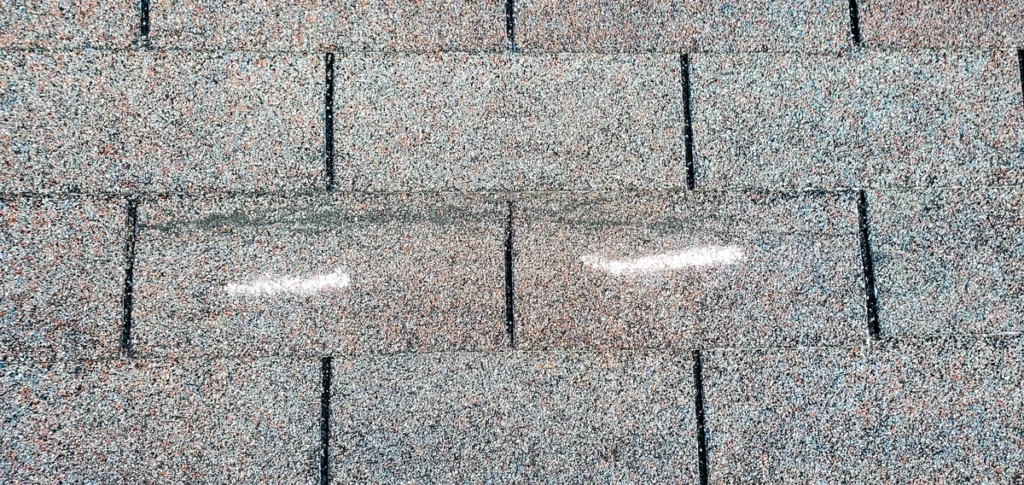
Signs of hail-damaged roofs include:
- Dented or bruised shingles: Look for random patterns of circular or oval-shaped dents where hailstones impacted the roof surface
- Granule loss: Hail strikes knock protective granules off shingles, creating dark spots or exposing the underlying asphalt. Check gutters and downspouts for excessive granule accumulation
- Cracked or fractured shingles: Severe hail impact can crack shingles, which may not be immediately visible but will leak over time
- Shingle bruising: Soft spots on shingles that feel spongy when pressed indicate underlying damage from hail impact
- Damaged roof accessories: Dented or cracked vents, damaged chimney caps, dents in metal flashing, and damaged satellite dishes
- Gutter and downspout damage: Dents and dings in gutters, downspouts, and gutter guards are often easier to spot than roof damage and indicate hail severity
- Damaged air conditioning units: If your outdoor AC unit shows hail damage, your roof likely sustained damage too
What to Do Next
Step 1: Time-Sensitive Inspection
Schedule a professional roof inspection within 30-60 days of a hailstorm. Some hail damage becomes more apparent over time, but waiting too long may complicate insurance claims. Most insurers give you 1-2 years to file, but prompt action is best.
Step 2: Check Gutters for Evidence
Examine gutters and downspouts for excessive granule accumulation, which is a clear sign of hail damage. Take photos of granules and any dents in gutters for documentation.
Step 3: Document Everything
Professional documentation is critical for hail damage claims. Have your contractor take photos of: each instance of hail damage with reference measurements, close-ups showing granule loss and denting, damage to multiple roof planes and accessories, and date and location metadata on all images.
Step 4: File Insurance Claim
Contact your insurance company to file a claim. Request an adjuster inspection. Have your roofing contractor present during the adjuster’s inspection to ensure all damage is documented. Many contractors offer free inspections and will work directly with your insurance.
Step 5: Professional Repair or Replacement
Based on the extent of damage, your insurance company may approve repair of isolated sections or full roof replacement. Extensive hail damage (affecting more than 30% of roof surfaces) typically qualifies for full replacement under most insurance policies.
Average insurance payout for hail damage: $8,000-$15,000 for full roof replacement on typical single-family homes. Actual payouts depend on your policy, deductible, roof size, and material costs in your area.
3. Water Damage
How to Identify Water Damage
Water damage from storms often results from heavy rainfall overwhelming roofing systems, ice dams causing backup, or pre-existing roof vulnerabilities being exposed by weather. Water intrusion can cause extensive structural damage if not addressed immediately.
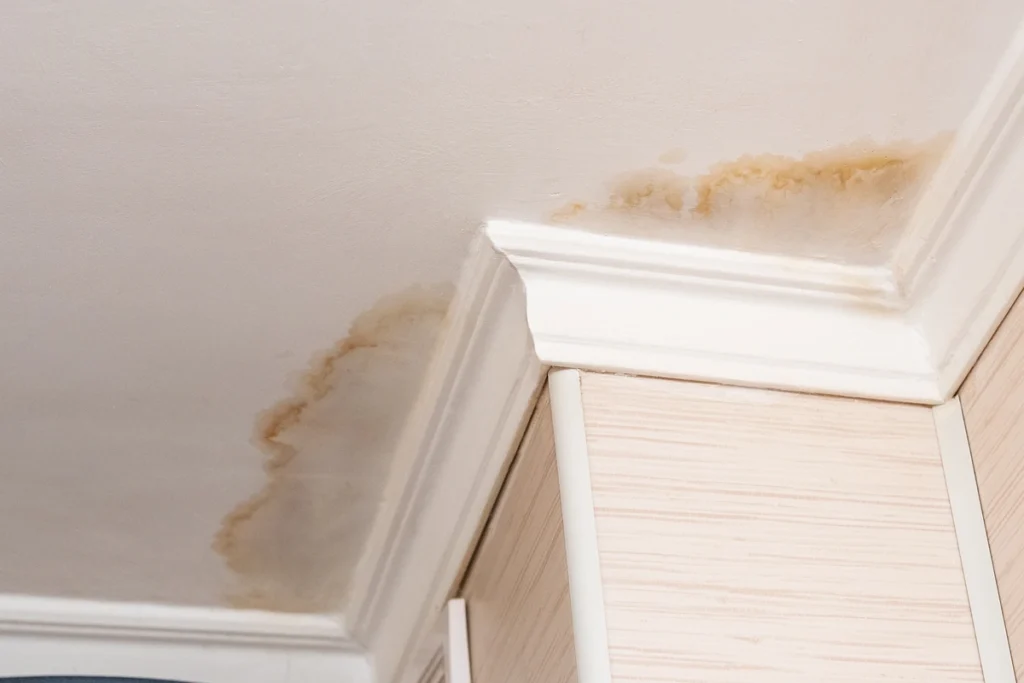
Signs of water damage include:
- Active leaks: Water dripping or running inside your home during or after rain, especially around chimneys, vents, or roof valleys
- Water stains: Brown, yellow, or dark stains on ceilings or walls, often with rings indicating repeated water intrusion
- Mold and mildew: Black, green, or white patches of mold on ceilings, walls, or in attics indicate prolonged moisture exposure
- Sagging roof deck: Visible sagging between rafters indicates water-saturated roof decking that may be structurally compromised
- Peeling interior paint: Bubbling or peeling paint on ceilings and walls near roof lines suggests moisture problems
- Musty odors: Damp, musty smells in upper floors or attic spaces indicate hidden water damage
- Increased energy costs: Wet insulation loses effectiveness, causing HVAC systems to work harder
What to Do Next
Step 1: Locate the Water Source
Identify where water is entering your home. Common entry points include damaged shingles, failed flashing around penetrations, clogged or damaged gutters causing overflow, and compromised roof valleys where two planes meet.
Step 2: Address Active Leaks Immediately
Place buckets under active leaks to protect floors and furniture. Move valuables and electronics away from wet areas. Use towels and fans to dry affected areas. If water is pooling on the roof, it may indicate drainage problems requiring immediate professional attention.
Step 3: Prevent Mold Growth
Mold can begin growing within 24-48 hours of water intrusion. Use fans and dehumidifiers to dry affected areas quickly. Remove soaked insulation, carpeting, or other porous materials that can’t be dried. Consider professional mold remediation if growth has already begun.
Step 4: Professional Inspection and Repair
Have a licensed roofer inspect both exterior roof damage and interior water damage to your attic, insulation, and living spaces. The inspection should identify the water entry point, assess structural damage to roof deck and rafters, check for compromised insulation, and evaluate interior damage requiring repair.
Step 5: Insurance Claim
Water damage from storms is typically covered by homeowners insurance. Document all damage with photos and videos. Keep damaged items for adjuster inspection. Save receipts for emergency repairs and temporary housing if needed. Work with your contractor to ensure the insurance company covers both exterior roof repairs and interior restoration.
Important: Insurance typically won’t cover water damage resulting from lack of maintenance or gradual deterioration. The damage must be from a sudden, identifiable storm event.
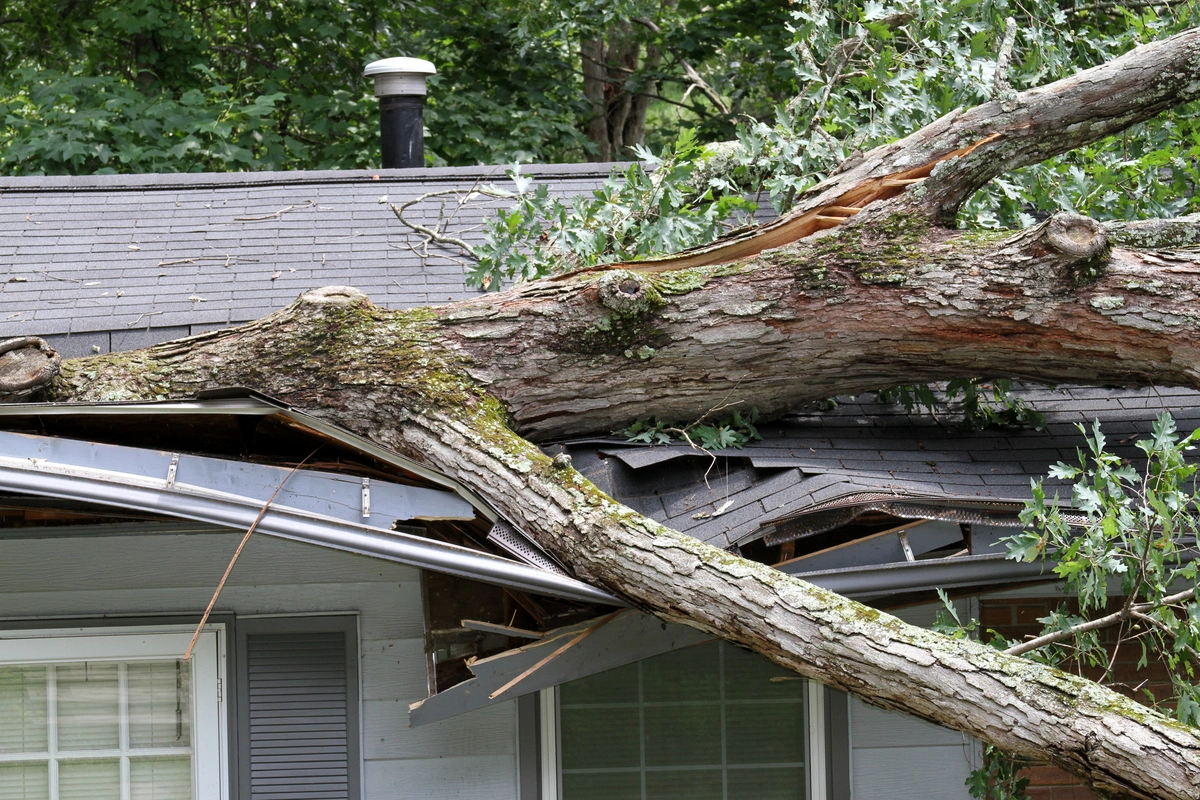
4. Impact Damage
How to Identify Impact Damage
Impact damage occurs when trees, large branches, or other heavy objects fall onto your roof during storms. This is one of the most serious types of roof storm damage because it can compromise structural integrity and create immediate water intrusion risks.
Signs of impact damage include:
- Visible debris: Tree branches, limbs, or entire trees resting on your roof
- Punctured roof: Holes through roofing materials exposing the interior structure or living spaces
- Broken or shattered shingles: Crushed or cracked shingles in localized areas showing clear impact points
- Structural deformation: Sagging, dipping, or visible changes in roof line indicating structural damage to trusses or rafters
- Damaged or collapsed chimneys: Impact can damage masonry and create additional hazards
- Interior exposure: In severe cases, you may see daylight through your ceiling or have debris enter your home
What to Do Next
Step 1: Ensure Safety First
If a tree or large branch has fallen on your roof, evacuate immediately if you hear cracking sounds, see sagging ceilings, smell gas, or notice electrical hazards. Never attempt to remove large debris yourself. Call emergency services if there’s immediate danger.
Step 2: Secure the Property
Once safety is confirmed, take steps to prevent further damage. Cover exposed areas with tarps weighted down securely. Move valuables away from damaged areas. Turn off utilities in affected areas if safe to do so. Take photos before covering damage for insurance documentation.
Step 3: Contact Emergency Services
For large trees or structural damage, you’ll need professional help: emergency tree removal services for safe debris removal, structural engineers for assessment of structural integrity (may be required by insurance), and licensed roofing contractors for emergency repairs and comprehensive assessment.
Step 4: Document Extensively
Impact damage claims require thorough documentation. Photograph: the debris on your roof from multiple angles, any holes or structural damage, interior damage from multiple rooms, surrounding property damage (fences, vehicles, etc.), and the tree or debris source showing it came from storm damage.
Step 5: File Insurance Claim Immediately
Contact your insurance company right away. Impact damage is almost always covered under homeowners insurance as a sudden, unavoidable peril. Your claim should cover: debris removal costs, emergency repairs to prevent further damage, structural repairs, roof repair or replacement, and interior restoration.
Step 6: Professional Repair
Work with licensed professionals for all repairs. A structural engineer may need to assess damage before repairs begin. Your roofing contractor should provide a comprehensive scope of work addressing structural repairs, roof deck replacement, new roofing materials, and interior repairs.
Average timeline for impact damage repairs: Emergency securing within 24-48 hours, debris removal within 1 week, structural assessment within 1-2 weeks, and complete repairs within 2-8 weeks depending on extent of damage.
5. Ice Dam Damage
How to Identify Ice Dam Damage
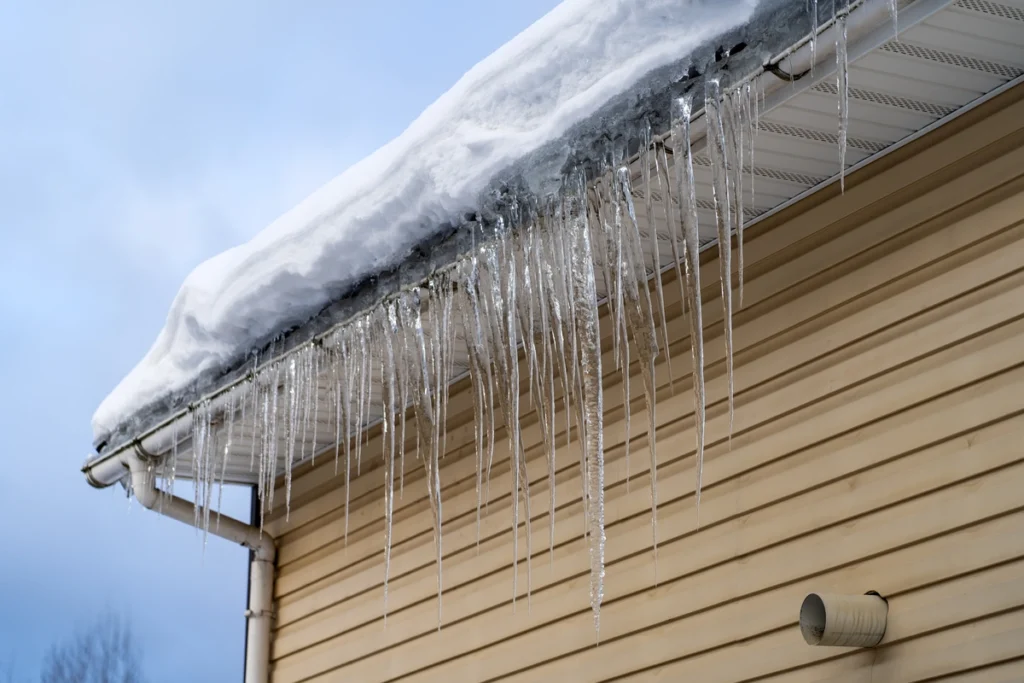
Ice dams form when heat escaping through your roof melts snow, which then refreezes at the colder roof edges. This creates a barrier that traps water, forcing it under shingles and into your home. Ice dams are common in regions with heavy snowfall and freezing temperatures.
Signs of ice dam damage include:
- Ice buildup at eaves: Thick ridges of ice forming along the edge of your roof, particularly at gutters and eaves
- Large icicles: While some icicles are normal, large formations often indicate ice dam conditions
- Water stains on exterior walls: Staining just below the roofline indicates water backing up under shingles
- Interior leaks during winter: Water spots on ceilings or walls appearing during freezing weather rather than rain
- Peeling paint: Interior paint blistering near exterior walls on upper floors
- Soggy insulation: Attic insulation appearing wet or compressed in areas near the roof edge
- Mold or mildew: Growth in attic spaces or on exterior walls due to moisture intrusion
What to Do Next
Step 1: Remove Snow Safely
Use a roof rake to remove snow from the lower 3-4 feet of your roof while standing safely on the ground. Never climb on an icy roof or use sharp tools that could damage shingles. Focus on creating channels for water drainage.
Step 2: Address Active Leaks
If water is already leaking inside, place buckets to catch drips and use fans to dry affected areas. Do not attempt to chip away ice dams yourself, as this can damage your roof. If leaking is severe, contact emergency services.
Step 3: Professional Ice Dam Removal
Hire professionals who use low-pressure steam to melt ice dams safely. This method won’t damage your roof like ice picks, hammers, or high-pressure water. Professional removal typically costs $400-$800 depending on severity.
Step 4: Improve Attic Ventilation and Insulation
Ice dams often indicate inadequate attic insulation or ventilation. Long-term solutions include: increasing attic insulation to R-38 or higher, improving attic ventilation with ridge and soffit vents, sealing air leaks between living spaces and attic, and installing proper attic baffles to maintain airflow.
Step 5: Consider Preventive Measures
For homes prone to ice dams, preventive installations include: heated roof cables along eaves and valleys (cost: $200-$500), improved gutter systems with larger capacity, metal roofing panels at eaves (ice can’t grip metal as easily), and proper roof pitch in problematic areas.
Step 6: Document and File Insurance Claim
Insurance coverage for ice dam damage varies by policy. Some policies cover resulting water damage but not the ice dam removal itself. Document all damage with photos and keep receipts for professional removal services. Damage from ice dams is more likely to be covered if you can show you maintained proper home maintenance.
Prevention is key: Addressing ice dams before they cause damage is far less expensive than dealing with water intrusion and structural repairs. Invest in proper insulation and ventilation to prevent future ice dam formation.
6. Lightning Damage
How to Identify Lightning Damage
Lightning strikes on homes are less common than other storm damage types, but they can be catastrophic. A lightning strike can cause immediate visible damage, hidden electrical problems, and even fires. According to the Insurance Information Institute, lightning causes over $1 billion in insured losses annually.
Signs of lightning damage include:
- Burn marks or scorch patterns: Dark streaks or burned areas on roofing materials, especially near the highest points
- Holes or cracks: Lightning can punch holes through roofing materials or crack shingles and underlayment
- Shattered or exploded materials: The extreme heat from lightning can cause materials to splinter or explode
- Damaged roof penetrations: Vents, chimneys, or antenna mounts showing signs of electrical burning or melting
- Electrical system issues: Blown circuit breakers, damaged outlets, non-functioning appliances, or power surges
- Water intrusion: Leaks developing immediately after a thunderstorm
- Smoke or fire damage: In severe cases, lightning can ignite roofing materials, attic insulation, or structural components
- Structural cracks: Lightning traveling through the structure can crack masonry, foundation, or framing
What to Do Next
Step 1: Ensure Electrical Safety
If you suspect a lightning strike, check for fire or smoke in attic spaces or walls. Turn off main electrical breaker if you detect any burning smell or see signs of electrical damage. Do not use electrical systems until inspected by a licensed electrician. Call 911 if there’s any active fire or smoke.
Step 2: Document Visible Damage
Photograph all visible roof damage, burned or damaged materials, and any interior damage. Note the time of the storm and lightning strike if witnessed. Check for damage to trees, fences, or other structures that may indicate the lightning’s path.
Step 3: Professional Inspections
Lightning damage requires multiple professional inspections: licensed roofer to assess structural roof damage, licensed electrician to inspect all electrical systems and wiring, HVAC technician to check heating/cooling systems, and potentially a structural engineer for significant damage.
Step 4: File Comprehensive Insurance Claim
Lightning damage is covered under virtually all homeowners insurance policies. Your claim should include: roof repairs or replacement, electrical system repairs, damaged appliances and electronics, HVAC system repairs, structural repairs, and fire/smoke damage remediation if applicable.
Step 5: Address Hidden Damage
Lightning damage often extends beyond visible areas. Have professionals check: wiring throughout the home, including in walls and attic, HVAC systems and ductwork, plumbing (lightning can travel through pipes), home technology systems (security, internet, smart home devices), and appliances, even if they currently work.
Step 6: Consider Lightning Protection
After repairs, consider installing a lightning protection system (cost: $2,000-$4,000) which includes: lightning rods on roof peaks, conducting cables to ground, grounding electrodes, surge protectors for electrical panel, and bonding of metal systems (plumbing, HVAC). Many insurance companies offer discounts for lightning protection systems.
Important note: Some electrical damage from lightning may not be apparent immediately. Electronics and systems may fail weeks or months later due to power surge damage during the strike. Keep detailed records of the lightning strike for future claims if needed.
7. Snow Load Damage
How to Identify Snow Load Damage
Heavy snow accumulation can place tremendous stress on roof structures. The weight varies significantly: light, fluffy snow weighs about 3-7 pounds per square foot, while heavy, wet snow can weigh 12-20 pounds per square foot. Ice adds even more weight at approximately 57 pounds per cubic foot. When snow accumulation exceeds your roof’s design load capacity, structural damage can occur.
Signs of snow load stress and damage include:
- Visible sagging: Roof deck sagging between rafters or trusses, visible from inside attic or from exterior
- Interior cracks: New cracks appearing in drywall ceilings or at ceiling-wall joints, particularly in center of large rooms
- Doors and windows sticking: Difficulty opening or closing doors and windows due to frame distortion
- Popping or cracking sounds: Audible creaking, popping, or cracking noises from the roof structure
- Roof deck separation: Visible gaps between roof deck and support members
- Leaning walls: Interior or exterior walls leaning or bowing due to roof load transfer
- Sprinkler head displacement: Fire sprinkler heads pointing at different angles due to ceiling movement
- Severe signs requiring immediate evacuation: Loud cracking sounds, significant sagging (more than 1-2 inches), large ceiling cracks, or doors/windows suddenly jamming shut
What to Do Next
Step 1: Assess the Danger Level
If you observe severe warning signs like significant sagging, large cracks, or hear loud cracking sounds, evacuate immediately and call emergency services. A roof collapse can occur with little warning when snow load exceeds structural capacity.
Step 2: Professional Snow Removal
For excessive snow accumulation, hire professional snow removal services rather than attempting it yourself. Professionals use proper techniques to: remove snow gradually and evenly to prevent stress concentration, avoid damage to roofing materials, identify and work around weak areas, and prioritize critical areas like valleys and flat sections.
DIY snow removal safety tips (if absolutely necessary):
- Use a roof rake from the ground – never climb onto a snow-loaded roof
- Remove snow in layers rather than all at once
- Work from eaves upward, never stand directly under work area
- Leave a few inches of snow to protect shingles
- Watch for power lines and falling ice
Step 3: Document Conditions
Before snow removal, photograph: roof profile showing sagging, interior cracks and damage, snow depth on roof using markers, and surrounding areas for context. Record dates and approximate snow amounts from weather reports.
Step 4: Structural Assessment
After snow removal, have a structural engineer inspect the roof system for: cracked or damaged rafters/trusses, roof deck damage or separation, wall and support beam integrity, and safety for reoccupying the structure.
Step 5: Necessary Repairs
Snow load damage may require: structural reinforcement of trusses or rafters, roof deck replacement in damaged sections, interior drywall and ceiling repairs, and potentially full roof replacement if damage is extensive.
Step 6: Insurance Claim
Snow load damage is typically covered by homeowners insurance if the snow accumulation was unusual or excessive for your area. Your claim should include: documentation of weather conditions and snow amounts, structural engineer’s assessment report, photos of damage before and after snow removal, and estimates for all necessary repairs.
Step 7: Prevention for Future Winters
Consider these preventive measures: regular snow removal during winter (before accumulation exceeds 6-12 inches depending on snow type), structural reinforcement if your home wasn’t built to regional snow load codes, improved attic ventilation to prevent ice dam formation that can add weight, and monitoring systems that alert to excessive roof loading.
Know your roof’s capacity: Most modern homes are built to handle 20-30 pounds per square foot of snow load, but this varies by region and building age. Consult with a structural engineer to understand your specific roof’s capacity and safe snow accumulation limits.
🙌 Shield Your Roof, Save Your Home
Storm damage to your roof can be overwhelming, but identifying the signs and acting quickly can prevent further damage and lower repair costs. Prioritize safety when inspecting and addressing roof issues. If you’re unsure about the extent of the damage or the next steps, trust our team at Puetz Construction. Our experts provide reliable advice and ensure your roof is properly restored. Protect your home and gain peace of mind with our trusted services. Contact Puetz Construction today for all your roofing needs!
FAQs
What is considered storm damage to a roof?
Storm damage to a roof includes any harm caused by severe weather events such as wind, hail, heavy rain, lightning, or falling debris. Common signs include missing or damaged shingles, dents in roofing materials, water leaks, granule loss, broken gutters, and damaged flashing. Wind damage typically shows as lifted, curled, or missing shingles, while hail damage appears as dents or bruising on shingles and metal components.
How long do I have to file a roof damage claim after a storm?
Most insurance policies require you to report storm damage promptly, typically within 24-48 hours of discovering the damage. However, you usually have 1-2 years to file the actual claim, depending on your state and policy terms. It’s best to contact your insurance company immediately after a storm to document when the damage occurred and start the claims process. Delays in reporting can lead to claim denials if the insurer determines you allowed damage to worsen.
Is it worth filing an insurance claim for roof damage?
You should file an insurance claim for roof damage if the repair costs exceed your deductible by at least $1,000-$2,000 and the damage was caused by a covered storm event. Filing a claim is worth it for significant damage like widespread hail impact, major wind damage with multiple missing shingles, or structural damage from falling trees. However, for minor repairs under $500-$1,000, paying out of pocket may be better to avoid potential premium increases.
Fresh From our Blog