Vinyl Siding Repair Guide for Damaged Exterior Panels
Written By: Justin Puetz | June 26, 2026 | 10 Minute Read

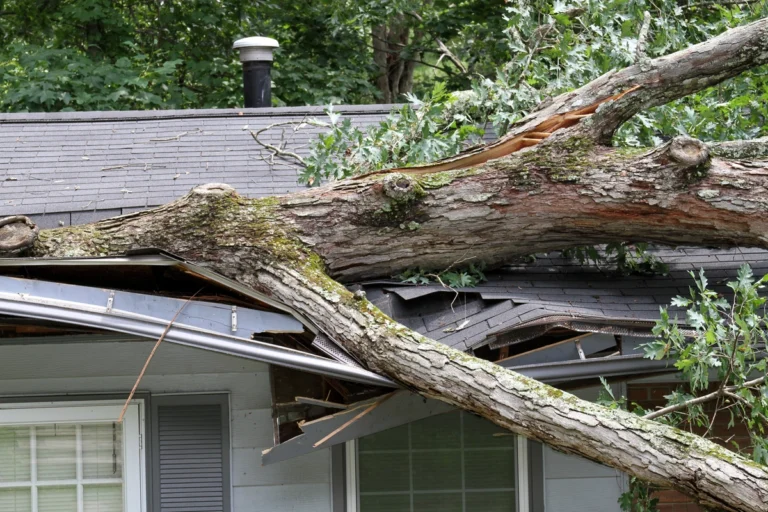
Your home’s exterior takes a beating year after year, and vinyl siding is not immune to the damage that comes with it. Hail, wind, impact, and simple age can leave panels cracked, warped, or missing altogether. Knowing how to approach vinyl siding repair the right way keeps moisture out, maintains your home’s curb appeal, and prevents small problems from turning into expensive structural issues. If you are also thinking about the bigger picture for your home’s exterior, exploring your full range of cladding options is a smart first step before diving into repairs.
What you’ll learn:
- How to identify the most common types of vinyl siding damage
- When a repair is sufficient and when replacement makes more sense
- A step-by-step breakdown of how professional vinyl siding repairs are done
- Tools, materials, and techniques that produce lasting results
- How Minnesota’s climate affects vinyl siding and what to watch for seasonally
Why Addressing Vinyl Siding Damage Promptly Pays Off
Vinyl siding is one of the most popular exterior cladding choices for good reason. It is durable, low-maintenance, and with proper care can last 30 to 40 years. But when it is damaged and left unaddressed, that resilience works against you. Water finds its way behind compromised panels and into the wall assembly, where it can saturate insulation, rot sheathing, and create ideal conditions for mold growth inside the wall cavity. By the time those problems are visible from inside the home, what started as a minor repair has grown into something considerably more expensive.
Here is why acting on siding damage sooner rather than later is always the right call:
- Protects your wall assembly: The siding itself is the first line of defense, but the sheathing, housewrap, and insulation behind it are what truly keep your home dry and energy-efficient. Damaged siding puts all of those layers at risk.
- Preserves curb appeal and home value: Cracked, discolored, or visibly damaged siding signals deferred maintenance to buyers and appraisers alike. Timely repairs protect the investment you have made in your home.
- Prevents escalating repair costs: A cracked panel addressed in summer is a straightforward fix. The same crack left through a Minnesota winter, where moisture enters, freezes, and expands repeatedly, can mean replacing sheathing, insulation, and multiple panels by spring.
- Maintains energy efficiency: Gaps in the siding envelope allow air infiltration that raises heating and cooling costs. Tight, intact siding is a meaningful contributor to how well your home manages temperature year-round.
For homeowners in Owatonna and surrounding areas, where freeze-thaw cycles are aggressive and hail events are common, the window between manageable repair and costly remediation can close faster than expected. Staying ahead of damage is always less expensive than catching up to it.
7 Steps in a Professional Vinyl Siding Repair
Understanding the repair process from start to finish helps you evaluate the quality of the work being proposed and ask the right questions of any contractor you hire. Vinyl siding repair is not complicated when it is approached correctly, but it does require the right tools, proper sequencing, and attention to detail at every step. Rushing or skipping steps is how repairs fail prematurely, leaving homeowners dealing with the same problem again within a season or two.
1. Assess the Damage and Identify the Scope
Before any tools come out, the full extent of the damage needs to be documented. What looks like one cracked panel on the surface sometimes reveals water-damaged sheathing or housewrap failure once the panel is removed. A thorough assessment includes checking the panels above and below the visible damage, inspecting trim and flashing around windows and corners, and probing for soft spots that indicate moisture infiltration. Getting the scope right at this stage prevents costly surprises mid-repair.
2. Source a Matching Panel
One of the trickiest parts of vinyl siding repair is finding a replacement panel that matches the existing siding in profile, texture, and color. Manufacturers regularly update and discontinue product lines, and color matching becomes more difficult as existing siding fades over time.
- Bring a sample of the existing siding to a supplier for comparison whenever possible
- Check whether the original installer left any extra panels stored in the attic or garage
- Apply several coats of exterior paint formulated for vinyl if you need to blend a close-but-not-exact color match
- If a match is unavailable, replacing a full section or elevation may produce a cleaner result than a visually mismatched patch
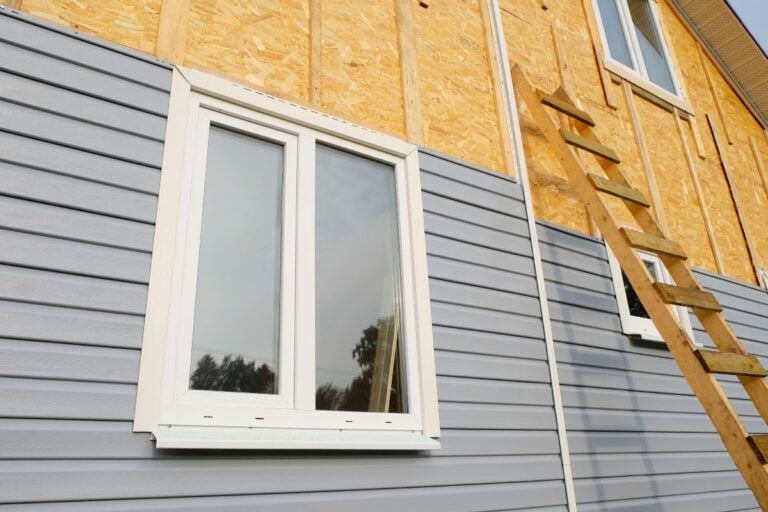
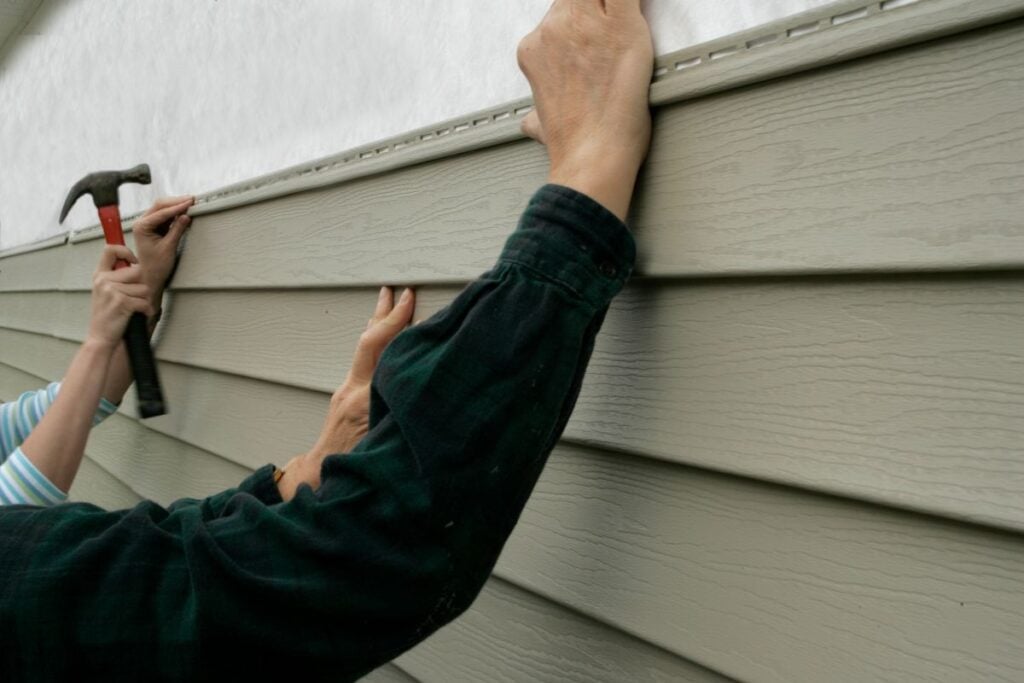
3. Remove the Damaged Panel Using a Zip Tool
A zip tool, also called a siding removal tool, is a J-shaped hook that slides under the bottom edge of the panel above the damaged one and unlocks the interlock between the two panels. This allows the upper panel to be lifted and the damaged panel beneath it to be accessed without causing additional damage. Attempting to remove vinyl siding without a zip tool typically results in cracked or warped panels above the repair area, turning a one-panel fix into a multi-panel job.
4. Inspect and Repair the Wall Behind the Panel
With the damaged panel removed, the wall surface behind it must be inspected before the new panel goes on. This is the step that separates a surface-level repair from one that actually solves the underlying problem.
- Check the housewrap for tears, gaps, or areas where water has been tracking behind the siding
- Look for soft or discolored sheathing that indicates water infiltration
- Replace any compromised housewrap sections and allow the wall to dry fully before reinstalling siding
- In Owatonna and surrounding areas, late spring and early fall repairs often reveal winter moisture damage that would have gone undetected without this step
5. Cut and Install the Replacement Panel
Vinyl siding expands and contracts significantly with temperature changes, and the replacement panel must be cut and installed to account for that movement. A utility knife or tin snips are used to cut panels to size. Panels are trimmed slightly shorter than the measured opening, typically by about a quarter inch on each end, to allow for thermal expansion. The new panel is locked into the panel below it first, then nailed through the nailing hem at the top. Nails should be driven centered in the slots, not tight against either edge, so the panel can move freely. Nailing too tightly is one of the most common installation errors and leads to buckling during temperature swings.
6. Lock the Panel Above Back Into Place
Once the replacement panel is secured, the panel above it is pressed back down and locked into the interlock using the zip tool or by hand pressure along the bottom edge. The lock should engage with a clear snap along the full length of the panel. An incomplete lock at any point creates a gap where wind-driven rain can enter. Running a gloved hand along the locked seam confirms full engagement before calling the repair complete.
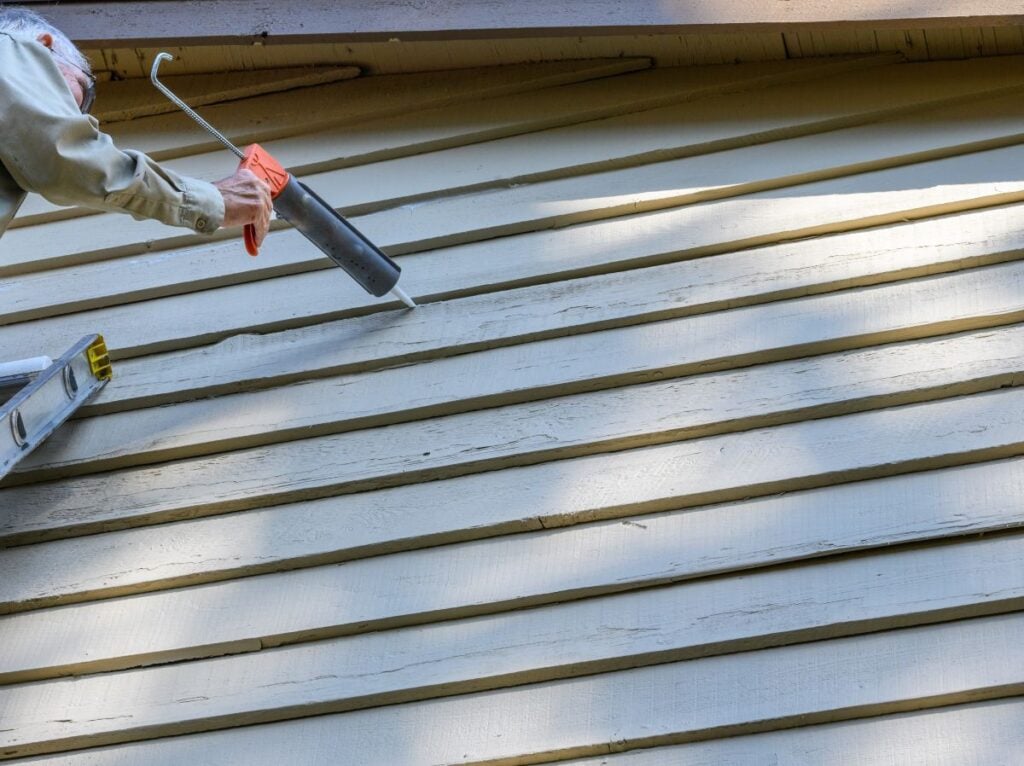
7. Seal Any Cut Edges or Penetrations
Any cut edges at the ends of panels, around trim pieces, or at penetrations like electrical outlets and hose bibs should be sealed with a paintable, waterproof exterior caulk compatible with vinyl. For small holes under about half an inch, caulk alone is often sufficient. Larger holes up to about an inch can be filled using a vinyl siding patch kit, with filler applied using a putty knife, dried, and sanded smooth before paint is applied to blend the repair area. Sealant and filler should be tooled smooth and wiped clean before curing so they do not trap dirt or draw attention to the repair.
Getting all seven steps right requires the right tools and a clear understanding of how vinyl siding systems behave. Homeowners who attempt repairs without a zip tool or without checking the wall behind the panel frequently end up with work that looks fine on the surface but allows moisture infiltration to continue.
Reading the Damage: What Different Types Tell You
Not all vinyl siding damage looks the same, and the type of damage often signals its cause. Understanding what you are looking at helps you address the root issue rather than just the symptom, which is how you avoid the same problem coming back the following season.
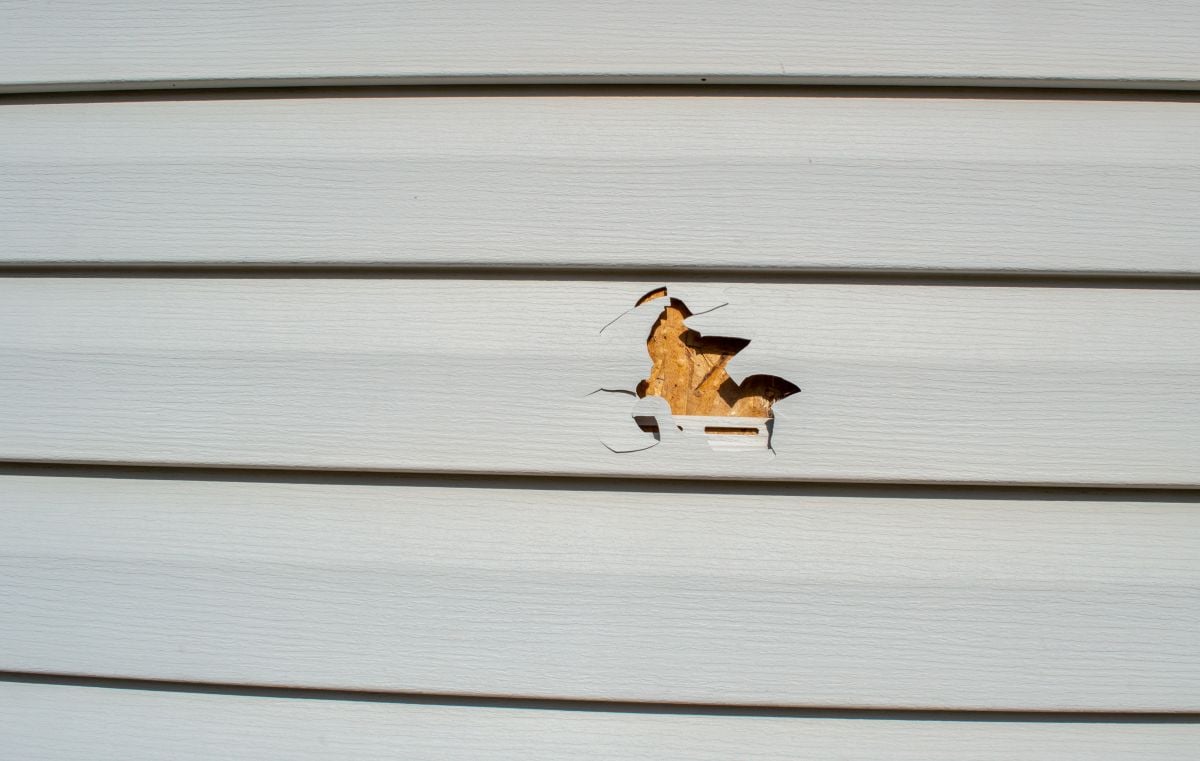
- Cracks running horizontally across a panel are usually the result of impact from a hail strike, a thrown object, or a ladder placed against the wall. These are straightforward repairs as long as the underlying wall is unaffected.
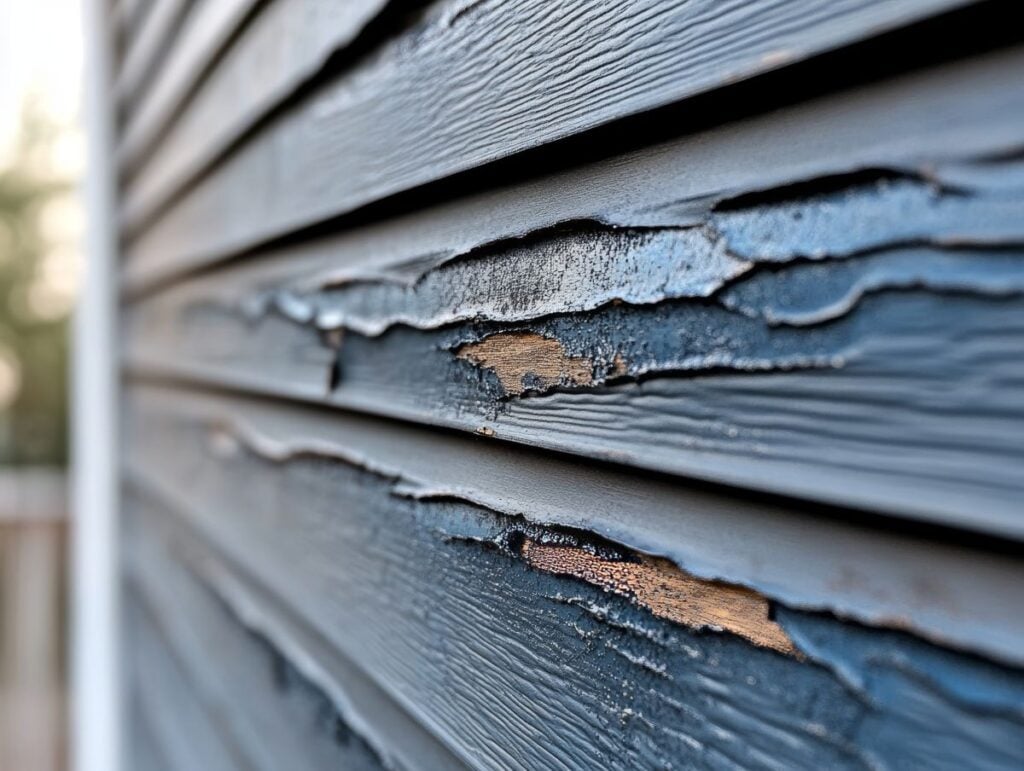
- Warping or buckling that creates a wavy or rippled appearance is typically a sign of improper installation, with panels nailed too tightly or without adequate expansion gaps. The repair needs to address the installation method, not just the cosmetic appearance of the affected panels.
- Holes or punctures from nails, screws, or direct impact may look minor but allow water to enter the wall cavity directly. Small holes can be patched with a vinyl siding repair kit or filled with exterior caulk, while larger holes typically require a cut patch or full panel replacement. Either way, the wall behind the damaged area should be checked for moisture before the repair is sealed.
- Panels that have pulled away from the wall or lost their interlock are often the result of wind damage. These are best addressed by a contractor, as re-engaging the interlock safely requires specific tools and technique.
- Fading or discoloration concentrated in a specific area can indicate moisture wicking up from below, biological growth behind the panel, or prolonged UV exposure. This type of damage warrants a closer look at what is happening behind the siding, not just on its surface.
Knowing what type of damage you are dealing with changes the repair approach entirely. A contractor who takes the time to diagnose the cause, not just patch the surface, is the one whose work will still be holding up two winters from now.
Repair or Replace: How to Know Which Path Makes Sense
One question homeowners face regularly is whether to repair individual damaged panels or replace siding across an entire wall or elevation. There is no single right answer, but there are clear signals that point toward one path or the other.
Repair is the right call when:
- Damage is limited to one to three panels in an isolated area
- A matching panel can be sourced without significant difficulty
- The wall behind the damaged area is dry and structurally sound
- The rest of the siding on that elevation is in good condition and relatively uniform in appearance
Replacement of a full elevation makes more sense when:
- The existing siding is brittle, heavily faded, or showing widespread cracking typical of aged vinyl
- Matching panels are unavailable and a visible patch would be obvious
- Multiple areas across the same wall face show damage or failure
- The homeowner is planning a broader exterior renovation in the near term and wants consistent results
For many properties in Owatonna and surrounding areas, older homes with original siding installed in the 1990s or earlier are approaching or past the typical 30 to 40 year lifespan of vinyl siding. At that stage, isolated repairs may buy only a year or two before the next issue surfaces. In those situations, a full replacement conversation with a qualified contractor is worth having sooner rather than later.
Your Exterior Is Worth Getting Right
A well-executed vinyl siding repair keeps your home protected, maintains its appearance, and extends the service life of an otherwise sound exterior. Done poorly, it is a temporary patch that delays a bigger problem. The difference comes down to experience, proper tools, and the discipline to check what is happening behind the panel before putting new siding over it. Puetz Construction brings that level of care to every project we take on, whether it is a two-panel repair or a full replacement across the entire home. If you have noticed damage on your exterior and want a professional evaluation, contact us today and let’s take a look together.
Fresh From our Blog